How to Implement canActivate in Angular
In this article, we will learn how to implement the canActivate route guard to a specific route path in an Angular application.
First, we will understand about route guard, the route guard does not allow unauthorized users to access URLs in the application. When we create a route guard in a route path, It controls whether the users will access the application path or not.
Angular supports route protection via route guards. It provides different types of route guards like canActivate, canActivateChild, canDeactivate, canMatch and resolve. These are properties of the Route interface.
CanActivate Guard
The canActivate route guard decides if the route can be navigated. The canActivate guard checks if the user is logged in or not. The user can not visit any specific route without authentication. It prevents route navigation for unauthenticated users and sends it to the default URL.
The required use cases for the canActivate guard:
1- Checking if a user has logged in - In the Application, if the user has not logged in, the route guard redirect the user to the default or login page.
2 - Checking if a user has permission: The route guard checks if the user has permission to access the page URL in the application.
Code Snippet:
canActivate(
      route: ActivatedRouteSnapshot,
      state: RouterStateSnapshot
  ): Observable | Promise | boolean | UrlTree
In the above syntax, canActivate is a method and it include two parameter one is route and the other is state.
route: ActivatedRouteSnapshot : The route contains information about the activated route.
state: RouterStateSnapshot: The state includes information on a tree of activated route snapshots.
The canActivate accepts Array type data and return multiple types of value, like boolean, Promise, Observable, UrlTree.
We use a guard on the application route path with the canActivate method and write the logic in this method for every user. When the user navigates the URL, the guard returns a true or false value.
1: If the method returns true, the user can access a certain URL.
2: If the method returns false, the user can not access a certain path, and it redirect the user to the login page.
3: If the method returns UrlTree, the current navigation cancels, and the new navigation starts.
4: If the method returns promise or an observable, the router wait for it to resolve before proceeding with the navigation.
CanActivate guard Example:
In this example, I will create angular project and will create auth-guard.service for declare canActivate method.
Step 1: Create Auth guard service
In the below code:
- 1: We first import the Router, ActivatedRouteSnapshot, RouterStateSnapshot from the
'@angular/router'. - 2: Next, we import AuthService from './auth.service' file.
- 3: Inject the AuthService in the constructor of the guard.
- 4: In the canActiavte method, we redirect the user to the login page, if the user is not logged in.
- 5: In the canActiavte method, we redirect the user to a certain page, if the user is logged in.
app/authentication/services/auth-guard.service.ts
import { Injectable } from '@angular/core';
import { Router, ActivatedRouteSnapshot, RouterStateSnapshot } from '@angular/router';
import { AuthService } from './auth.service';

@Injectable()
export class AuthGuardService {

	constructor(private authService: AuthService, private router: Router) {
	}
	canActivate(route: ActivatedRouteSnapshot, state: RouterStateSnapshot): boolean {
		let url: string = state.url;
		if (this.authService.isUserLoggedIn()) {
			return true;
		}
		this.authService.setRedirectUrl(url);
		this.router.navigate([this.authService.getLoginUrl()]);
		return false;
	}
}
Step 2: Create Auth service for Authentication
In the below code, we create the AuthService class and inside create the isUserAuthenticated method for validating user ID and password.
app/authentication/services/auth.service.ts
import { Injectable } from '@angular/core';
import { Observable, of } from 'rxjs';
import { map } from 'rxjs/operators';

import { User } from './user';

const USERS = [
	new User(1, 'rajeev', 'r123', 'ADMIN'),
	new User(2, 'santosh', 's123', 'USER')
];
let usersObservable = of(USERS);

@Injectable()
export class AuthService {
	private redirectUrl: string = '/dashboard';
	private loginUrl: string = '/login';
	private isloggedIn: boolean = false;
	private loggedInUser = {} as User;
	getAllUsers(): Observable {
		return usersObservable;
	}
	isUserAuthenticated(username: string, password: string): Observable {
		return this.getAllUsers().pipe(
			map(users => {
				let user = users.find(user => (user.username === username) && (user.password === password));
				if (user) {
					this.isloggedIn = true;
					this.loggedInUser = user;
				} else {
					this.isloggedIn = false;
				}
				return this.isloggedIn;
			}));
	}
	isUserLoggedIn(): boolean {
		return this.isloggedIn;
	}
	getRedirectUrl(): string {
		return this.redirectUrl;
	}
	setRedirectUrl(url: string): void {
		this.redirectUrl = url;
	}
	getLoginUrl(): string {
		return this.loginUrl;
	}
	getLoggedInUser(): User {
		return this.loggedInUser;
	}
	logoutUser(): void {
		this.isloggedIn = false;
	}
}
Step 3: Create auth-routing.module
app/authentication/auth-routing.module.ts
const authRoutes: Routes = [
	{
	  path: '',
	  component: LoginComponent
	}
];
Step 4: Create auth.module.ts
app/authentication/auth.module.ts
import { NgModule }   from '@angular/core';
import { CommonModule }   from '@angular/common';
import { ReactiveFormsModule }    from '@angular/forms';

import { LoginComponent }  from './login.component';
import { AuthRoutingModule }  from './auth-routing.module';

@NgModule({
  imports: [
        CommonModule,
		ReactiveFormsModule,
		AuthRoutingModule
  ],
  declarations: [
        LoginComponent
  ]
})
export class AuthModule { }
Step 5: Create app.routing.module
In the below code, we create an app.routing.module to configure all routes paths. In this file, we import ActivatedRouteSnapshot, RouterModule, RouterStateSnapshot, Routes from '@angular/router' module. Here we use canActivate method to check user is authenticated or not.
app/app.routing.module.ts
import { NgModule, inject } from '@angular/core';
import { ActivatedRouteSnapshot, RouterModule, RouterStateSnapshot, Routes } from '@angular/router';
import { DashboardComponent } from './dashboard/dashboard.component';
import { AuthGuardService } from './authentication/services/auth-guard.service';

const routes: Routes = [
   {
		path: '',
		redirectTo: '/dashboard',
		pathMatch: 'full'
	},
   {
		path: 'login',
		loadChildren: () => import('./authentication/auth.module').then(m => m.AuthModule)
	},
   {
      path: 'dashboard',
      component: DashboardComponent,
      loadChildren: () => import('./dashboard/dashboard.module').then(mod => mod.DashboardModule),
      canActivate: [
			(route: ActivatedRouteSnapshot, state: RouterStateSnapshot) =>
				inject(AuthGuardService).canActivate(route, state)
		],
   }
];

@NgModule({
   imports: [
      RouterModule.forRoot(routes)
   ],
   exports: [
      RouterModule
   ]
})
export class AppRoutingModule { }
Output:
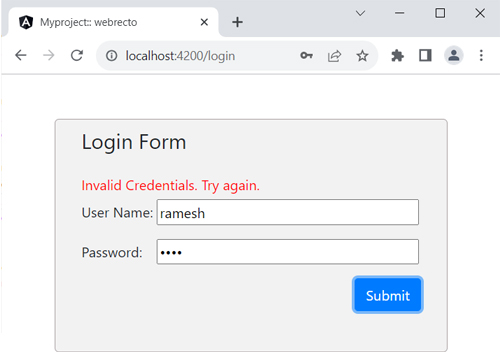
Login screen: Users can enter userid and password to navigate the application.

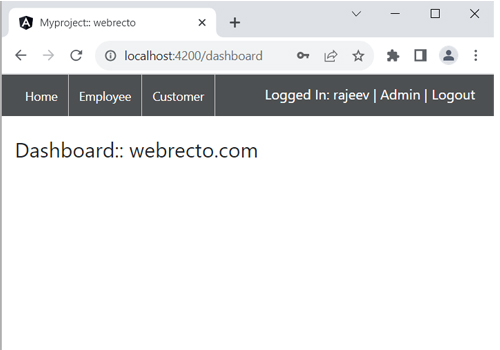
After authentication successful screen: If user authentication is successful, then can navigate the URL in the application.

After authentication fail screen: If user authentication is not successful, then he can not navigate the URL in the application, and the user will be redirected to the login page.

Reference
Download Complete Running Source Code
I am providing canActivate running code. You can download the src folder and include it in your project.
