Install the React Router Dom and Use in React
Introduction
In this article, we will learn about router installation in the React application, and we look at what type of software is needed for setup routing. React does not provide any default routing with the create a new application by create-react-app command. We will configure the router from a third-party module named react-router-dom. This module gives many components to handle the page linking to each other.
What is React Router?
The React Router is a superior library for page routing in applications. It helps the navigation between views of various components in a React application. The Router navigation is authorized to change the browser URL when clicking any navigation or page link.
The React Router handles the client and server-side routing in the application. It smoothly changed the page views in the web and mobile applications without page refresh. The React Router provides the browser history feature for saving page views, so we can save the application view with the help of this. It allows dynamic and conditional-based routing in the project when using server-side data in the route path.
Requirements of Software
We installed some necessary software to set up the React Router in the system.
Nodejs
NPM
VS code
Let's start to create a project for using routing to change multiple page views.
Step 1: Create a React Project
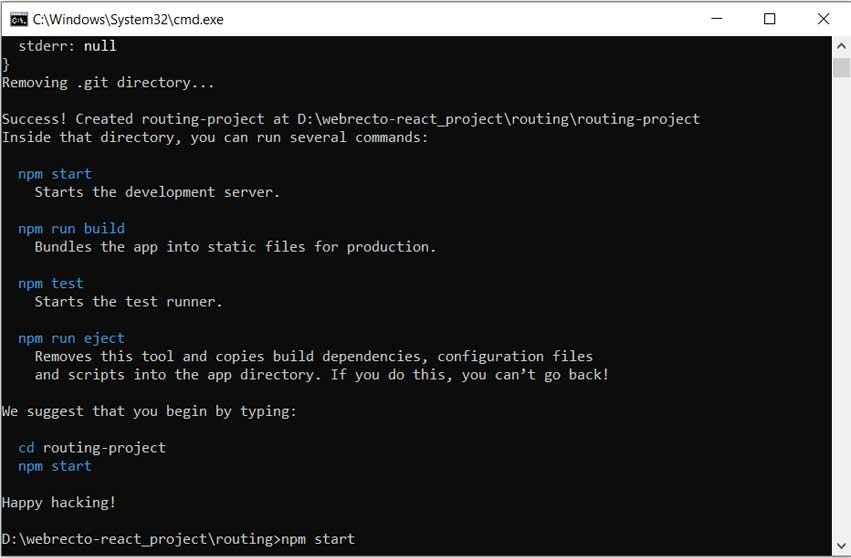
It is a very easy way to create a React project with the help of the create-react-app command. So we can use this command line to set up the initial label project on any folder.
npx create-react-app routing-project
First, we open a command prompt or VS code terminal to run this line for the setup project and put this line to run. After finishing the command downloading you will find "routing-project" in the folder where you running this.
Step 2: Installing React Router
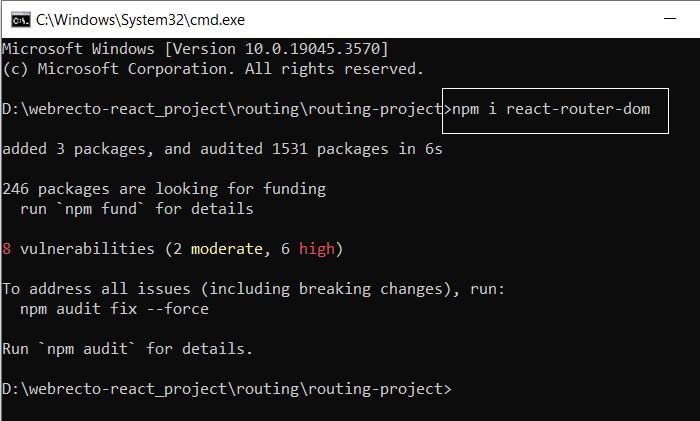
We have set up the new project, Next, we will go inside the project folder and run the new command react-router-dom to the installation of the routing feature.
// Installing Routing
npm i react-router-dom
  "dependencies": {
    "@testing-library/jest-dom": "^5.17.0",
    "@testing-library/react": "^13.4.0",
    "@testing-library/user-event": "^13.5.0",
    "react": "^18.2.0",
    "react-dom": "^18.2.0",
    "react-router-dom": "^6.17.0", // Installed latest version
    "react-scripts": "5.0.1",
    "web-vitals": "^2.1.4"
  },
When finished react-router-dom installation from the command line, we find the latest version of react-router in package.json. if we do not set the package version in case of installation, it is always installed latest version of the React Router.
Step 3: Setup Routes in React Component
In the application, we will use the route in the component where need to use navigation to different pages. The react-router-dome package provides different types of components to handle the page navigation. We import BrowserRouter, Routes, and Route from the packages for route configuration in the application.
3.1 Importing React Router
import { BrowserRouter, Routes, Route, Link } from "react-router-dom";
There are four main components of React Router to use in page navigation.
- BrowserRouter: The BrowserRouter wraps to all content. It is a parent component that is used to collect all components inside them.
- Routes: It is a new component that replaces of switch element and it was introduced in v6 and the latest version also uses this. In this application, we can use multiple Routes. But in the example, we are using only one Routes.
- Route: The Route is used to add component name and path. It creates a single Route for every component to change the browser URL. The Route can be nested and it is written inside the Routes wrapper. The Route component takes two arguments one is path and the other is element.
- Path: The path parameter specifies the URL location of a certain page. We use the page URL name inside the path parameter. If we want a page redirect without any click link then use backslash(/) and want to page change any certain URL then we use the URL name inside the path parameter.
- element: The element parameter identifies the component which component we want to render from a certain path.
- Link: The link component is the same as html anchor tag. It is used to create links to different routes and implement navigation in the application.
<Route path="" element={} />
Note: In react-router-dom v6, 'Switch' is deprecated. it is replaced by 'Routes'.
import React from 'react';
import './App.css';
import { BrowserRouter as Router, Route, Link, Routes } from "react-router-dom";
import Dashboard from "./Dashboard";
import Employee from "./Employee";
import Customer from "./Customer";
import About from "./About";

function App() {
  return (
    <div className="App">
      <Router>
          <Routes>
            <Route path="/" element={<Dashboard />} />
            <Route path="/employee" element={<Employee />} />
            <Route path="/customer" element={<Customer />} />
            <Route path="/about" element={<About />} />
          </Routes>
      </Router>
    </div>
  );
}
export default App;
Step 4: Implement Components for Routing
We created four components to connect for Route. All components render when changing path from the Route. The component is displayed inside the Routes component.
Dashboard.js
import React from 'react';
const Dashboard = () => {
  return (
    <>
    <h3>This is dashboard page.</h3>
    </>
  );
};
export default Dashboard;
Employee.js
import React from 'react';
const Employee = () => {
  return (
    <>
    <h3>This is employee list page.</h3>
    </>
  );
};
export default Employee;
Customer.js
import React from 'react';
const Customer = () => {
  return (
    <>
    <h3>This is customer list page.</h3>
    </>
  );
};
export default Customer;
About.js
import React from 'react';
const About = () => {
  return (
    <>
    <h3>This is About us page.</h3>
    </>
  );
};
export default About;
Step 5: Use Link to Change Routes
The Link component is used to connect every page address to change the browser path. It is similar to tag in HTML. The link component provides a "to" attribute to identify the path name. When we click on the link, it is invoked a certain path to the renders component and it changes the browser address.
<div className="App">
    <ul>
        <li><Link to="/">Dashboard</Link></li>
        <li><Link to="/employee">Employee</Link></li>
        <li><Link to="/customer">Customer</Link></li>
        <li><Link to="/about">About</Link></li>
    </ul>
</div>
Browser Path
React Router creates different browser paths for every component. The user can set the browser path name according to the component name or business logic. When we run the project the below path will display in the address bar.
- http://localhost:3000/employee
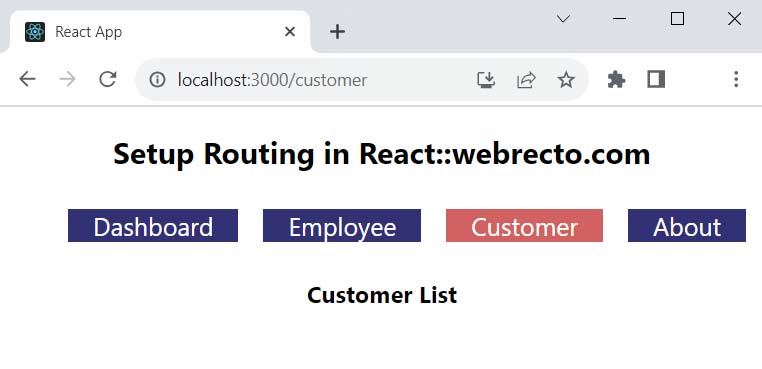
- http://localhost:3000/customer
- http://localhost:3000/about
Complete Example
In this example, we have set up react-router-dom and I am using React Router components to navigate various components from link click.
import React from 'react';
import './App.css';
import { BrowserRouter as Router, Route, Link, Routes } from "react-router-dom";
import Dashboard from "./Dashboard";
import Employee from "./Employee";
import Customer from "./Customer";
import About from "./About";

function App() {
  return (
    <div className="App">
      <Router>
        <div>
          <nav>
            <ul>
              <li><Link to="/">Dashboard</Link></li>
              <li><Link to="/employee">Employee</Link></li>
              <li><Link to="/customer">Customer</Link></li>
              <li><Link to="/about">About</Link></li>
            </ul>
          </nav>
          <Routes>
            <Route path="/" element={<Dashboard />} />
            <Route path="/employee" element={<Employee />} />
            <Route path="/customer" element={<Customer />} />
            <Route path="/about" element={<About />} />
          </Routes>
        </div>
      </Router>
    </div>
  );
}
export default App;
Find the print screen of the output.